Monday, 8 March 2010

Altered Canvas


I altered this canvas for a 21st Birthday.

I used a cheap white canvas and covered it with turqoise paint. I then used a cosmic shimmer mist in purple violet to add a little to the background. I also punched some hearts and sprayed those with cosmic shimmer mist in aqua lagoon colour.

The swirls are cut from chipboard and painted green. I finished off the canvas with some tiny flowers and pearl dots.

Wednesday, 3 March 2010

Frugal Scrapping

My friend Jayne taught a class at our fundraising crop, I loved the papers so much I was determined to use them. I can't show you the class, but I managed to make 6 more layouts using cardstock and some other scraps of paper I had.

I made this layout using a technique taught by Giselle where you cut scraps of paper into 2" by 1" and place around a photo.

The other layouts were inspired by photos in magazines and sketeches.

I hope this will inspire you to use up all your scraps, especially with papers you love!


I have managed two cards out of the remaining bits, and I still have a few birds to cut out.

Sunday, 28 February 2010

Magazine Rack


This is a photo of the magazine rack I altered for our charity crop. I used a sizzix die to cut out the swirls and the bird is a quickutz die.

I cant wait to see how other people altered theirs.

Monday, 1 February 2010

Tiny little glimpse


This is the second of four items we will have for sale at the charity crop, all I can tell you is that this one will be quite useful for storage of something we scrappers love.

Wednesday, 27 January 2010

Valentine Charity Crop

Faye Bertham and I with lots of help from friends are currently organising our next charity crop, with all proceeds going to St Peter's hospice.

We have had fun altering some items that we are hoping will sell on the day. This is a peak at mine.


And this is Faye's, the colours are absolutely beautiful, and although we started with the same item they have both turned out very different.
I will post a proper picture of both "items" after Feb 13th.

Wednesday, 6 January 2010

Exciting news!


Well today has started really well, we have had loads of snow in the night and school is closed and then I found out that I won a prize in the Fiskarettes Christmas competition. This is the card I made for the competition, and I am ashamed to say have not given to anyone, I can't bear to part with it lol.

Monday, 28 December 2009

Making my own stamps


As I can't find the button to upload this to UKS I am putting it on my blog. Had a stamp maker for Christmas and I am so delighted with my first stamp. I can't believe the detail that the stamp has, it's a photo of my great grandparents wedding.

I just need to experiment now with different types of ink etc.

Wednesday, 9 December 2009

3D Star card


I have been playing around with making things 3D at the moment. I used my shapecutter to cut out a circle in the card and 2 stars in gold to slot together. The stars are stuck to the back using acetate, and the card does fold down flat when it's in a card.

Monday, 23 November 2009

Thank you card


I made this card using Lavinia stamps, for the Fiskarettes challenge.

I wanted the card to be quite delicate so I stamped the floral background first with versamark and then applied perfect pearls. I also used a small butterfly stamp. I fixed the perfect pearls using a tiny bit of water in a mini mister.

Once the card was completely dry I stamped the image in the middle of the card and embossed with gold embossing powder.

I added pearl drops and cut out the letters to spell thank you.

Saturday, 21 November 2009

Cute Mini Book with instructions


I saw a book like this in a local shop, went home and spent hours working out exactly how to make it. I like the way the pages explode into a fairly flat shape making it ideal for lots of mini photos. Cut a piece of paper 8” by 4”

Then you need to fold your paper. I used a scoring blade as you can score all the folds accurately. If you don’t have a scoring blade you could use a bone folder.


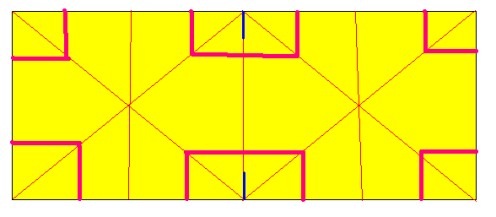
Then in the middle of the rectangle, cut 1” in both sides, (dark blue line on the picture.)

Then you need to make the 1” square folds in each corner.


The folds in the books are mountains (going up towards you) or valleys (opposite direction) I hope this diagram shows you which direction the folds need to go in.

The pink lines are folds that go up/mountains. The turquoise lines are folds that go down/valleys. The black lines are where you have already cut your paper.


Once you have managed your squished together folds, you need to make a cover for your mini book.

Cut a strip of card 2.5” wide and 9” long. Use the scoring blade for folds at the following measurements. 2.5” then 2” then 2” and finally 2.5”


I glued a piece of ribbon on the inside of the card before I stuck the folded mini book on the top, this makes a nice closure.

I added lots of mini photos, the beauty of this book is that you can place so many tiny photos. They don’t have to be stuck completely to each fold, some of mine come off the edge but fold away beautifully when it comes to close the book.


Im going to try adapting this pattern to make a larger book, and will post instructions as soon as I have worked it out.

Wednesday, 18 November 2009

Thank you Carmen


I received this award from the lovely Carmen, so thank you for thinking my blog is fabulous. I have to list 5 things I am obsessed with at the moment, and pass the award on to five other people.

1. I have become a bit obsessed with card making, apart from making card toppers and selling them on ebay to make a bit of money I have never really been interested in cards. I think the NEC and some of the lovely stamps I bought there are to blame.

2. Promarkers, I cant believe I have only just discovered them, I love the bright colours and the way the colours blend without damaging the paper.

3. I am determined to find time to properly find out how to use my camera on manual settings, it is a bridge camera but I really want to improve my photos.

4. Scrapbooking, mini books and altering things.

5. Creating a record of memories for my children. I have a number of little note books and scraps of paper all being collected with memories, funny things children have said in work and little things like notes the children left when they were younger.

As I cant pass this award back to Carmen, I am sending it to these people.

Jayne, at http://boringhousewifexx.blogspot.com/
Claire at http://www.curlylockspicsandpieces.blogspot.com/
Eleanor at http://www.paperseaside.blogspot.com/
Andrea at http://andreagourley.blogspot.com/
paper and string looks lovely, I often go to look at the shelves of buttons etc lol.

Tuesday, 17 November 2009

Combining border punches, School photo layout


Did you know you can combine some border punches to make a new design. I used the fiskars ribbon punch combined with the border lace punch to make a new border. Line the ribbon border with the scallops on the lace punch. The layout is one of my DT projects for Fiskarettes.

Saturday, 14 November 2009

Aluminium Tape and leaves


One of the challenges on Fiskarettes was to use a leaf from your garden, I used a bayleaf to make a tag, but when I was experimenting I tried using some herbs from the garden too, They could make really nice lables for Herb containers.

Friday, 13 November 2009

Christmas Cards


I've been making Christmas cards, the first one is for my Fiskarettes design project and uses a masking technique inspired by a post on Its a creative world, and the second picture shows cards I have made with a beautiful stamp and lots of stickles bling.

Friday, 6 November 2009

Astronimical clock


I made this layout for the Fiskarettes challenge. The photos are of the astonomical clock in Prague.

Saturday, 24 October 2009

Grungeboard Watch Straps


Have had the most amazing weekend with fellow scrappers, we decided to have a go at making our own grungeboard watch straps, and these are the results.

Friday, 23 October 2009

I love Polar Bears


A layout I did for the Fiskarettes challenge this week. I was really pleased with these pics taken at Berlin Zoo.

Sunday, 11 October 2009

Felt Christmas Trees


It's a creative world have a Christmas theme for this month. These are the Christmas tree decorations I made for my first post. They are really easy to make and an ideal way to use up all those little scraps of ribbon and buttons.

Sunday, 4 October 2009

Modscraps Crop


Had a lovely time at Modscraps crop yesterday Ellie asked if I would teach a class using bazzil bling templates. This is the layout I came up with. Lovely to see everyone and catch up, can't wait for the next one.

Thursday, 1 October 2009

Cute mini folded book


This is really tiny but so effective. Instructions are over on Fiskarettes.