
Ellie has a sketch challenge for Modscraps, although I don't often work with four photos I really enjoyed making this layout.

 My friend Lynne recently spent a couple of hours showing my friends and I how to use a melt pot. I am currently saving my pennies to buy one of my own. When I saw a lady at the NEC who was using aluminium foil tins and a heat gun to melt the utee I realised I could start experimenting while I saved.
After hours of googling, I think what I have is gel flex, (an identical product apparently is vinamold.) I had this product from years and years ago to make plaster moulds. What I like about it is you can re-melt it, if your mould doesn't work out, so there is no waste.
I melt mine in a jug in the microwave, check on it every 10 seconds, less if it is close to being totally melted as it can quickly go over the temperature and burn.


I have used silicone cupcake moulds to pour the melted gel flex over. It cools down fairly quickly and shows the detail of very delicate things.

 I hope you might be inspired to have a go at making your own moulds, I will be looking out for old fashioned keys etc to make more.


Last month my friend and I organised a fund raising day for a local hospice, to raise some extra money I altered some plastic boxes and lids into something useful.
I often find that I use the same recipes over and over again, they are always in different cookbooks, and if DH cooks, the pages are splattered with his culinary achievements, (a failsafe way to spot a good recipe in our house). I decided to make a wipe clean recipe book for those recipes we use time and time again.
The covers are plastic, they came from a large lid cut down into the right size, but plastic file folders or dividers would work just as well. The inside pages are printed and then laminated.


The box that my recipe book goes in has been covered with paint dabbers, and then I used a phone directory and decopatch glue to stick strips randomly on the front. I used a lime green paint dabber and a baby wipe to make a colour wash all over the cover once the glue was dry, and added a couple of embellishments and the word recipes.


The ribbon boxes had a clear see through lid, a friend suggested punching holes and after decorating I think it makes a rather nice ribbon holder.


The mini book has yet to be decorated, I used two sheets of plastic with holes punched in for the front and back cover and then cut half a sheet into squares to use as tabs on each page. A really simple idea but a good way of recycling.

I altered this canvas for a 21st Birthday.
I used a cheap white canvas and covered it with turqoise paint. I then used a cosmic shimmer mist in purple violet to add a little to the background. I also punched some hearts and sprayed those with cosmic shimmer mist in aqua lagoon colour. I made this layout using a technique taught by Giselle where you cut scraps of paper into 2" by 1" and place around a photo.
 The other layouts were inspired by photos in magazines and sketeches.


 I hope this will inspire you to use up all your scraps, especially with papers you love!
I have managed two cards out of the remaining bits, and I still have a few birds to cut out.


 Then you need to make the 1” square folds in each corner.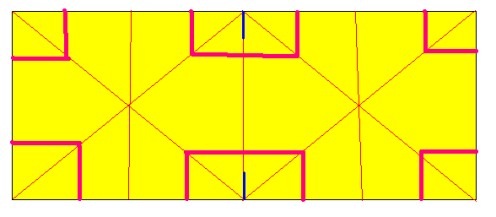
The folds in the books are mountains (going up towards you) or valleys (opposite direction) I hope this diagram shows you which direction the folds need to go in.
The pink lines are folds that go up/mountains. The turquoise lines are folds that go down/valleys. The black lines are where you have already cut your paper.

Once you have managed your squished together folds, you need to make a cover for your mini book.
Cut a strip of card 2.5” wide and 9” long. Use the scoring blade for folds at the following measurements. 2.5” then 2” then 2” and finally 2.5”

I glued a piece of ribbon on the inside of the card before I stuck the folded mini book on the top, this makes a nice closure.


I added lots of mini photos, the beauty of this book is that you can place so many tiny photos. They don’t have to be stuck completely to each fold, some of mine come off the edge but fold away beautifully when it comes to close the book.
Im going to try adapting this pattern to make a larger book, and will post instructions as soon as I have worked it out.


 Did you know you can combine some border punches to make a new design. I used the fiskars ribbon punch combined with the border lace punch to make a new border. Line the ribbon border with the scallops on the lace punch. The layout is one of my DT projects for Fiskarettes.


